Pages - Menu

Saturday, December 27, 2014

Pink Hair!

Hey everyone! 
My sister dyed my hair today and I'm dying to share some photos of it!  So obsessed with how it came out. She even layered it a bit.


I hope the photo quality isn't too bad, I'll hopefully take some better photos of it soon..

Thanks for reading! 
<3 Anna

Thursday, December 25, 2014

Christmas Watermarble

Hey everyone!
I did some simple water marbling for Christmas today. Thought it would be cute with a little gold glitter trim around the edges. I used all China Glaze polishes.


You can check these polishes out here on China Glaze's website.
Have a safe and Happy Holidays!

I hope you're having a great week, thanks for reading!
<3 Anna

Tuesday, December 23, 2014

China Glaze Holiday 2014 Collection "Twinkle"

Hey everyone!
Today I have swatches of China Glaze's Holiday Collection "Twinkle" to share with you all! It's quite the collection. It has a good mix of everything; glitters, shimmers, solid colors, Christmas colors, and simple winter colors. That's what I like most about this collection, that it has a little bit of something for everyone, no matter what holiday you celebrate. Even then, some shades, like "No Peeking!" for example, can be worn whenever, and not have a 'holiday' vibe.
(click on photos to enlarge)

"No Peeking!"
A beautiful deep, shimmer purple. Application was very smooth, although you can see a few of the brush strokes. It's not terribly bad though. If you're careful enough, you can avoid them.
two coats; no top coat

"Dancing and Prancing"
A rainbow glitter top coat. Another polish that isn't 'holiday specific' but will still add a little bit of a festive tone to your nails during the season. I was able to get all this coverage in one coat, I was pretty impressed.
one coat of "Dancing and Prancing" over two coats of "No Peeking"; no top coat

"Tip Your Hat"
A smooth, red polish. A perfect red, in my opinion, for Christmas day. It's simple, elegant, and not over-the-top if worn by itself.
two coats; no top coat

"Pine-Ing for Glitter"
A green glitter topper. China Glaze must be cookin' up something real good when they made all these glitter toppers. They packed in enough glitter that you only need to apply one coat.
one coat of "Pine-Ing for Glitter" over two coats of "Tip Your Hat"; no top coat

"I'd Melt for You"
A silver metallic polish. This one was the only polish I found a little tricky in applying. It streaks quite a bit, and you have to be quick when applying it, because if the polish is like, 'half-dry' then you'll end up pulling all the polish off your nails with the second coat. It also dries really thin, so if you have any dents or ridges in your nails I recommend using a Ridge Filler (OPI has a good one) as a base coat or all the ridges will show.
two coats; no top coat

"Feeling Twinkly"
A blue glitter topper. Again, only needed one coat to get this coverage. The polish is a little water-y, so I recommend shaking the bottle a little before using it and maybe even in between coats just to move the glitters around.
one coat of "Feeling Twinkly" over two coats of "I'd Melt for You"; no top coat

"Define Good..."
A deep, ruby red shimmer polish. I think this is my new favorite polish ever. The color is so deep and beautiful, in my opinion, and it only needed one coat. The application of it was very smooth, and there weren't any brush strokes visible in the polish (unlike the other shimmers). A tad more elegant that the previous red polish, "Tip Your Hat". I also think that this is the most festive/holiday polish in this collection, so if you only could buy one polish, I highly recommend this one.
one coat; no top coat

"De-Light"
A gold/holographic glitter topper. Super packed with glitter, I can't believe how much coverage it gets in one coat. Kinda crazy. The only thing I don't like so much about this polish is the bar glitters, but that's just a personal preference. They don't stick up or anything, so if you like bar glitters, then just ignore what I'm saying!
one coat of "De-Light" over one coat of "Define Good..."; no top coat

"Out Like a Light"
A smooth grey polish. Nothing fancy, but I like that a dark neutral color was added into the collection. It's a nice breather from all the glitter and shimmer going on.
two coats; no top coat

"Chillin' With My Snow-mies"
A white, matte glitter topper. This bottle is mostly clear polish, so your best bet is to just do some glitter placement. That way you don't end up with a pile of gloop and like, 2 dots on one nail. It's really easy to dab some of this polish on a napkin or something and take a toothpick to pick up the glitters. They're kind of big, so you don't have to do a lot of glitter placement to get a good amount on your nails.
glitter placement with "Chillin' With my Snow-mies" over two coats of "Out Like a Light"; with top coat

"December to Remember"
A shimmer blue polish with tiny pink-ish flakes. It's like the perfect 'winter' shade of blue.
two coats; no top coat

"Meet Me Under the Stars"
I think this polish is quite unique to a holiday collection; it's certainly not the first thing I think of in relation to the season. I think it's a super cute idea. It's a nice combination of festive glitter and a neutral color palette. 
two coats; no top coat

You can check these polishes out here on China Glaze's website.
Have a safe and Happy Holidays!

I hope you're having a super great week, thanks for reading!
<3 Anna

**These nail polishes were sent to me to review. All thoughts and opinions are my own and are not influenced in any way.

Friday, December 19, 2014

Christmas Nail Art

Hey everyone!
I did Christmas themed nail art on my friends nails! I only got a few good photos, but here's my favorite:


I used polishes from China Glazes 2014 holiday collection "Twinkle".
I'll link to a post of my swatches of this collection when I finish it.

Happy Holidays!


Thank you for reading! Have a safe and happy holiday season.
Anna <3

Thursday, November 27, 2014

Thanksgiving

Hey everyone!
I wish you're all having a Happy Thanksgiving! I wanted to share some photos I took today of my holiday nails and some of Thanksgiving dinner... Enjoy the photos!(:


Polishes I used. (Click to enlarge) 


Turkey! Soooo good!

My lovely family during dinner.

Me and my sister.

Thank you for reading! Have a safe and happy holiday season.
Anna <3

Tuesday, November 18, 2014

Some Color Changing Fun with Ruby Wing

Hey everyone! 
Time is flying by so fast. Hours, days, weeks, can all happen in a blink of an eye! I don't know how to slow it down so I can have more time to get things done. I feel like I'm in some sort of time warp where I'll never have the time to finish everything I want to finish! Where's a time machine when I need one! Doc? Doc, you there?! 
As my first semester of senior year comes to an end, finals are just around the corner. I'm drowning in my thesis work and all the essays I have to write!

I love doing my nails too much to go on a temporary break from blogging. It might seem like at times that I am ignoring my blog or falling behind on posting. I try to at least do one post a week when I'm really busy, and hopefully during Thanksgiving break I can catch up and plan ahead so I can try to get back to posting on a more regular basis. I'm finding this blogger app on my phone is quite helpful in writing my posts.

So on to the nails of the day..
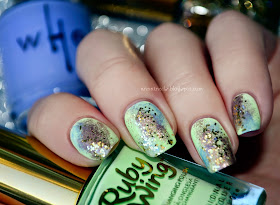
For this design I did something super simple. I painted my nails green using Ruby Wing's "Rodeo", which is a color changing polish (changes color in the sun). Then I lightly sponged wHet polish "Kerfuffle" (light blue) on top of the green, once it dried, in a different spot on each nail. I did the same with wHet polish "Machiavellian" (gold shimmer) on top of the blue. If you pat the sponge on a towel to get some of the excess polish off before applying it to your nails, it will be easier to achieve a light, thin layer that will actually look sponged and will only cover a small area as opposed to a giant dot or something. Then, I did the same thing with Ruby Wing "Ride me' Cowgirl". I still used the sponge to dab the gold glitter onto my nails, because it helps make the glitter more compact looking without applying a bunch of thick layers. The sponge absorbs the clear polish that the glitter sits in, which is nice. Doing the glitter with a sponge helps it dry faster, too.

Here are some photos;
(click on photo to enlarge)

inside

left; inside // right; outside

I love how much this design changes in the sunlight! The colors become so warm. The original light green color turns into a more dull, almost beige color in the sun. The blue and gold stay the same.
Then the gold glitter on top changed to a warm red. The clear polish the gold glitter is suspended in also gets tinted red.

outside
I really enjoy using color changing polish. It's always fun, especially when my friends realize it changes color, they can get really into it. I need to use these polishes more often!

Thanks for reading! I hope you're having a great week.
<3 Anna

Monday, November 10, 2014

3-Year Nail-versary

Hey everyone!
I know this a week late, but I still wanted to write about/celebrate my 3-year-nail-versary or however you wanna say it, haha. This Halloween marked my third full year doing nail art as a hobby. 

I still remember my freshman year of college I pulled an all nighter to do my nails, since I couldn't wear my costume to class. I think it was because we were working with tools or something, I don't remember, I just couldn't wear anything that could get snagged. I had no idea what I was doing. I used a toothpick to draw out the little designs, and attempted to clean polish off my cuticles with a q-tip. Which didn't work because the little hairs kept messing up my design and what not. I go to an art school (for photography), so I went to one of my fellow photo majors and asked her to help me take a photo of them.

Here's a photo of my first nail art (ever) from 2011;

Wow did I improve since then or what?! Haha..

Over the next year my nail art skills continued to improve a lot. My nail care on the other hand, not so much. It's a little embarrassing for me to look back on all the nail photos I took from my sophomore year. I hated filing my nails, so they were always different shapes and sizes. What what I thinking??

This photo is super embarrassing to share, but alas, here is my Halloween nail art from 2012;

Oh dear what was I thinking..

My nail care started to improve a lot my junior year. Overall, I was really happy with how my nails were shaped. They were also a lot healthier, since I started using oils and lotion more often. I recently shared my nails from last year in a post here, but I'm going to include them again cause why not.

Here is my Halloween nail art from last year, 2013; 

I was really happy with how these turned out. They glowed in the dark, but my camera at the time couldn't handle it. 

My senior year has been a huge stepping stone for me in terms of pretty much everything. I finally feel content with my nail art, nail care, my blog, photographing my nails, and everything in between. Now, finally, the moment you've all been waiting for..

Here is my Halloween design from this year, 2014;
I really love this design! I had so much fun while doing it, too.

Wow that felt like a lot of writing.
Well, that's it! My wrap-up of the past 4 Halloween nail art looks I did over the past three years.
Hopefully with many more to go!

I hope you all had a great Halloween! Thanks for reading!
<3 Anna

Friday, October 31, 2014

Halloween 2013 "Throwback"

Hey everyone!
I can't believe I never posted this, but I recently came across the Halloween look I did last year. I love this design I did, so even though it's from a year ago, I still wanted to share them!
I don't remember any of the colors I used, unfortunately.
(Click photos to enlarge)  


I hope you all are having a great Halloween! 
Thanks for reading!
<3 Anna

Thursday, October 30, 2014

Pretty Woman "Halloween Virtual Party" Nail Designs

Hey everyone!
I'm writing this post as a wrap-up for the "Virtual Halloween Party" hosted by Pretty Woman that happened last week.

I'm trying to type this on my phone right now. I just got a new one and I want to see how helpful this blogger app is. So far it's nice to not need my laptop to blog! Hopefully this leads to me posting more. I would love to be able to get into a work flow so I could start posting more regularly, like every other day or every day or something like that. 

But anyway, here are the designs I posted during my time slot 'takeover' on Pretty Woman's Instagram during the virtual party.

I just wanted to point out here that all products used in these designs are from Pretty Woman unless otherwise noted.
This will save the annoyance of repeating it under every photo.
Most of the other products include acrylic paints. Product info is listen under each photo.
(Click on photos to enlarge)

"Pumpkin Face"
I wanted to do a cute and simple design for my first look. By using my own dotting tool (a toothpick), I was able to make little dots with white paint and a small jack-o-lantern face with black paint. Took about 10 minutes to do this whole design on both hands.
Products used:
Gelogic "Coraliscious"
Black and White Acrylic Paint (from local craft store)

"Mini Pumpkin Patch"
I haven't done an intricate design in a while, so I dug around and found my really small tiny nail art brush and painted little pumpkins in a patch at night time. Got that golden moon and ominous clouds n stuff.

Products used:
Gelogic "Black Licorice"
Gelogic "Coraliscious"
"Sun of a Beach"
Green, brown, and grey acrylic paint (from local craft store)

"Costume Inspired"
For this look, I was inspired by a costume I wore when I was really young. I wanted to try something that didn't include orange, black, or pumpkins, and this came to mind. I think it's really easy and fun to be inspired by clothes for nail art. 
Products used:
"Stingray Chrome"
"Sun of a Beach"
Sea shell nail art (from the sea shell nail art kit)

"Autumn Leaves"
Seasonally appropriate nail look. See more of this look here.
Products used:
"Sun of a Beach" 
Leaves (found on the ground)

"Halloween Time"
I did this look for Pretty Woman's little Facebook nail art contest they hosted the day of the Virtual Party. I went all out with the orange background and then added bats and swirls with black acrylic paint.
Products used: 
Gelogic "Top Coat"
Black acrylic paint (from local craft store)
Too many colors to list!

I hope you're super excited for Halloween. I wish you a safe and happy night and weekend!
What are you all dressing up as? I didn't think ahead, so I'm not sure I'm even dressing up. Super bummer..  But tomorrow is my third anniversary of doing nail art! So you know my nails will look extra fabulous. I hope you're as excited as I am for that!

I hope you had a great week! Thanks for reading.
<3 Anna

*This post is not sponsored.